

Emeric
-
Content Count
25 -
Joined
-
Last visited
Posts posted by Emeric
-
-
4 hours ago, sand man said:Great job, but it seems very complicated to someone thats not good on a PC,,,like me.
Thanks ! Yeah actually there's no good and stable software to manage an Atlas Server like ARK has with ASM (This one look promising https://arkserverapi.com/resources/atlas-server-manager.80/ but it's nothing compared to ASM). And to be honest, i prefer to do my own scripts (i'm a web dev so of course it's easier for me) but at least you're sure to not have any side effect or errors from the software. I like said in the tutorial, i only had 2 crash since 1 month, so it's pretty stable to be honest. And of course if you have any problem or question to setup your server ask me.
-
17 hours ago, Momo Ochita said:As title say, I'm looking for some spec on CPU and RAM for a possible 5x5...
i was looking for CPU at some amd ryzen 7, they are good at it? or i7 are better?
And for RAM, what's the best?
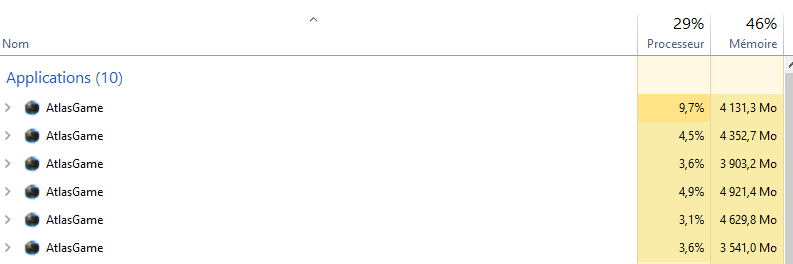
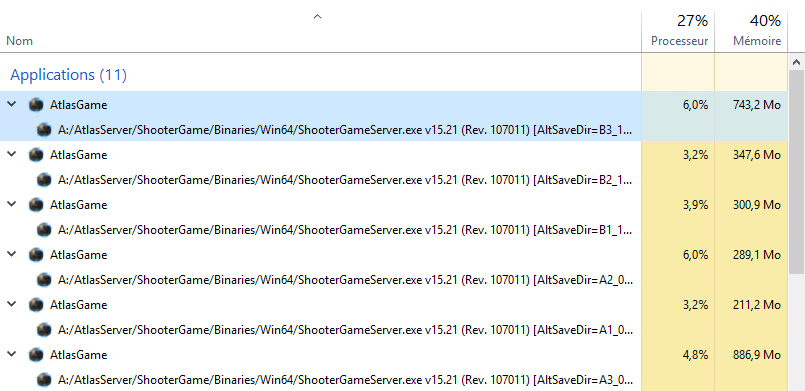
Map 3x3 with 0 players connected : http://prntscr.com/me7a2y With an Intel i7-7700K OC - 4c/8t - 5GHz, 64Go DDR4 2400 MHz and a NVMe hard drive.
But the RAM usage with also depend how many island do you have on each grid. -
18 hours ago, cokll said:Now My Redis to 40GB.
How Delete expired key!
Thx
I had the same problem on my server, my Redis DB started to get bigger and bigger (it shouldn't go up more than 10/15 MB) and the only solution was to do a rollback with a previous save of the redis_atlasdb.rdb and all the Saved directory.
-
 1
1
-
-
9 hours ago, doublee313 said:Awesome job man. Very detailed and great layout

Thanks !
-
3.9 Map Generated
I have uploaded my own map (3x3) for you so you can use it as you want but i recommand you to do your own since there're some error in this map.
My own map : https://www.fichier-rar.fr/2019/01/26/map-3x3-by-zoro/map-3x3-by-zoro.rar
4. Servers Configuration
4.1 Configuration files and map
Extract my own map in A:\AtlasServer\ShooterGame then extract the rar Saved (you can find it at the start of this tutorial) in A:\AtlasServer\ShooterGame\Saved .
Note : All the config files in the saved directory is from my own server, so you will have to modify it, specially the Game.ini and the GameUserSettings.ini for EACH server. Be carefull, the server A2 is the Freeport on my map, so the Game.ini is not the same as the other. Also the GameUserSettings.ini is different for each server (the RCON Port and the server name change)4.2 Redis
You will need to change the redis password.
To do it, go to the file A:\AtlasServer\AtlasTools\RedisDatabase\redis.conf and search requirepass : http://prntscr.com/mckfrq and put the same password you did in the 3. Map Creation -> 3.1 Project Creation -> New Database Settings. You can also find the password in the file A:\AtlasServer\ShooterGame\ServerGrid.ServerOnly.json at the bottom.
Note : There's a know bug where the password reset to the default password sometimes, so think about that if you have an error when launching Redis.5.Launcher Configuration
There we go, now we will create all the script you need to run the server.
5.1 Start and Stop
First, you will create a folder named Servers in A:\Launcher then you will create a file Servers.csv in this folder and put this code in it https://pastebin.com/x2BHSxFS. So your file must be in A:\Launcher\Servers\Servers.csv.
This list will be used to start all the server and broadcast a message to all server with McRCON.
Now you will create a file called start_all_servers.ps1 in A:\Launcher\Servers and put this code in it : https://pastebin.com/JTqvV98uYou will need to modify the IP by your public IP at the beginning of the script : $IP="XXX.XXX.XXX.XXX".
You can also remove/add/modify this script to your need, like adding parameters to the start command etc.
Now you will create a file called stop_all_servers.ps1 in A:\Launcher\Servers and put this code in it : https://pastebin.com/iCkeKm99
This code simply close all processus called ShooterGameServer. So becarefull with this script if you also run an ARK server on the same server because the name is the same.
5.2 RCONCreate a folder named RCON in A:\Launcher then create a file named broadcast_all_servers.ps1 in A:\Launcher\RCON and put this code in it : https://pastebin.com/TpGg9DRD
Note : You need to specify your public IP and the RCON password, it's the same password used in GameUserSettings.ini : ServerAdminPassword=12345
Download this application https://sourceforge.net/projects/mcrcon/files/latest/download and extract only the mcrcon.exe in A:\McRCON . This tool is used to broadcast a message on a server with the RCON protocol.5.3 Update
Create a folder named CRON in A:\Logs .
Now you will create a file called Cron_Update.ps1 in A:\Launcher and put this code in it : https://pastebin.com/4cFNiZL8
In this script, i have implemented a RCON broadcast message system to all server.
The script will do the following step in the right order :- Create a new log file
- Checking if there's an update for the game
- If there's an update the script will update the game else the script stop here
- If there's an update, the script will start to broadcast a RCON message to all servers to alert people that the server will restart in 10 minutes
- 5 minutes before the restart -> another RCON message
- 1 minute before the restart -> another RCON message
- The script call the other script A:\Launcher\Servers\stop_all_servers.ps1 to stop all servers
- The script call the other script A:\Launcher\Servers\start_all_servers.ps1 to start all servers
At each step there're logs written in the A:\Logs\CRON\$($Date)_Update_Log.txt file.
5.4 Save
Now we will create a script that will save the important files (specially the save of the game).
Create a file called Saved.ps1 in A:\Launcher and put this code in it : https://pastebin.com/80BFH55s
This script is documented so you can understand it it's not that hard.
6. Windows CRON Configuration
Now we will add 2 tasks in the Task Manager in Windows. This task will be executed automatically by Windows at X hours.
6.1 CRON Update
Search in Windows Task Manager and open it. Now do a Right Click on it then Create a new task : http://prntscr.com/mcjq7d
General :
Name : Check_Update
Don't touch to others fields
Triggers (hope the transalation is good cause my server is in french ) it's the second tab anyway :
Click on New a the bottom then try to do the same as in this screenshot : http://prntscr.com/mcjrrr for the start date just let the today date.
For the hours of the strat date, put the hours you want but put at 30 minutes so the script will start every hour at X hour and 30minutes (it's very important)
Click OK.
Actions :
Click on New a the bottom then :
Action : Start a program
Programme/Script : powershell.exe
Add arguments : A:\Launcher\Cron_Update.ps1
Then click OK to validate the task and you should see it in the list now.
To resume, this task will execute the script A:\Launcher\Cron_Update.ps1 with the program powershell.exe every hour indefinitely.
6.2 CRON SaveCreate a new task like you did just before.
General :
Name : Saved_Atlas
Don't touch to others fields
Triggers :
Click on New a the bottom then try to do the same as in this screenshot : http://prntscr.com/mcjz4m
For the hour of start put the hours you want but put at 15 minutes so the script will start every 30 minutes at X hours and 15 minutes and X hours and 45 minutes. (it's very important)
Click OK.
Actions :
Click on New a the bottom then :
Action : Start a program
Programme/Script : powershell.exe
Add arguments : A:\Launcher\Saved.ps1To explain you why i told you it was very important to put the minutes at 30 for the CRON Update task and at 15 minutes for the CRON Save task, it's because both tasks WON'T BE EXECUTED AT THE SAME TIME, so it won't overload the processor.

7. Windows Firewall Configuration
I know most of you don't like this part, but it's so easy you won't believe it.

To resume, we will create 2 rules one in UDP and the other in TCP and we will let the program (the server) handle it.
First, search in Windows Firewall and open it.
Now, at the right, click on New rule :- Select Program
- Select the second option and put : A:\AtlasServer\ShooterGame\Binaries\Win64\ShooterGameServer.exe
- Select Allow the connection
- Check only Private and Public
- Name : AtlasGame
- Validate OK
Now, Edit the rule and go to the tab Protocols and ports :
- Type of protocol : Select TCP
Click OK.
Add a New rule :
- Select Program
- Select the second option and put : A:\AtlasServer\ShooterGame\Binaries\Win64\ShooterGameServer.exe
- Select Allow the connection
- Check only Private and Public
- Name : AtlasGame
- Validate OK
Now, Edit the rule and go to the tab Protocols and ports :
- Type of protocol : Select UDP
That's all you need to do about the firewall.
Note : If you plan to buy the same server like i have from OVH (https://www.ovh.com/fr/serveurs_dedies/game/1901mc03.xml) you will need to disable the Firewall Game in the OVH interface -> IP -> Click on the 3 dots at the right -> Configure the game firewall -> Disable the game firewall8. Bonus
8.1 Create a custom RCON message
We will create a script that will allow you to broadcast a custom message to all servers, can be usefull for various reason.
Create a directory Manual in A:\Launcher.
Create a file named Custom_RCON_Message.ps1 in A:\Launcher\Manual and put this code in it : https://pastebin.com/puPCW86K
Each time you want to use it, change the message in it and do a Right Click on the file then Execute with Powershell and the script will broadcast your message to all your servers.9. Run the server

First you will need to run Redis, to do it run the file A:\AtlasServer\AtlasTools\RedisDatabase\redis-server_start.bat.
Redis must always be running before you start your servers.
Then you can run your servers with the script A:\Launcher\Servers\start_all_servers.ps1.
Now you have a server that will check for update/do the update and restart the server if needed and all that will be done automatically.
I'm running an Atlas Server since 1 month and to be honest the servers crashed only 2 times, so it's more than acceptable. (compared to ARK at the beginning
 )
)
They also make a lot of server optimisations, I have gain around 30% less usage for my CPU and around 10% for the RAM usage.This tutorial is over, i hope you will successfully configure your dedicated server and of course if you have any questions ask below and i will try to answer if i can.
I will probably modify it a lot in the next hours/days so don't hesitate to re-check it.

Sorry if my english isn't the best but i'm
 .
.
Thanks to my friend Neko who helped me to configure Windows and the Windows Firewall .

-
2
-
 1
1
-
Hey,
I see a lot of people having issues to set up their server so i will try to provide the best tutorial to build your own dedicated server.This tutorial will be on a 3x3 grids and based on this server from OVH : https://www.ovh.com/fr/serveurs_dedies/game/1901mc03.xml
I will also provide ALL powershell script that you need to run your servers.
Before, you will need the Server Grid Editor :
- https://github.com/GrapeshotGames/ServerGridEditor/archive/master.zip Extract it on your desktop for example.
- My own map : https://www.fichier-rar.fr/2019/01/26/map-3x3-by-zoro/map-3x3-by-zoro.rar
- Config files : https://www.fichier-rar.fr/2019/01/26/saved-1/saved.rar
1. Windows Configuration- The first thing you will need to do is to setup a new partition, around 400 GO and call this partition with the letter A and the name Atlas (on a new disk or not, it's like you want).
- The second thing to do is to setup another partition, but this one will be a bit bigger like 1To or more if you can and call it with the letter S and the name Save (it's better to do it on a new disk).
So if your Windows has a problem, all your saves and your servers won't be lost. I know most of you don't care about that, but it's very important.
You should have something like that now :

In the A: Atlas partition, you will create an architecture (folders) like that:
- AtlasServer
- Launcher
- Logs
- McRCON
- SteamCMD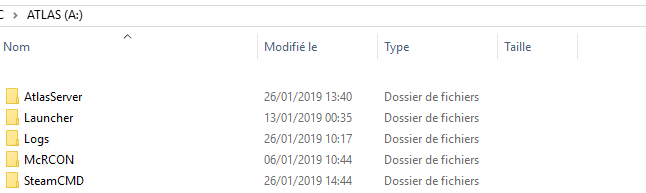
2. SteamCMD and Atlas Server Installation
Now, you will download this file called Installation_SteamCMD_and_AtlasServer.ps1 and put it in the Launcher folder : https://pastebin.com/SUqNtCrw (Don't forget to RENAME IT to Installation_SteamCMD_and_AtlasServer.ps1 without the .txt at the end.)
Now, you can do a right click and select Execute with Powershell. For your information, you should be verycarfull when you download and execute powershell/bash code from internet because it can't completly break your Windows.
This script will donwload and install Steamcmd in the folder SteamCMD and also donwload and install the Atlas dedicated server in the folder AtlasServer.
3. Map Creation
This is a big part of the tutorial and probably one of the most important. So be carefull about what you will do and be sure to do step by step.
3.1 Project Creation
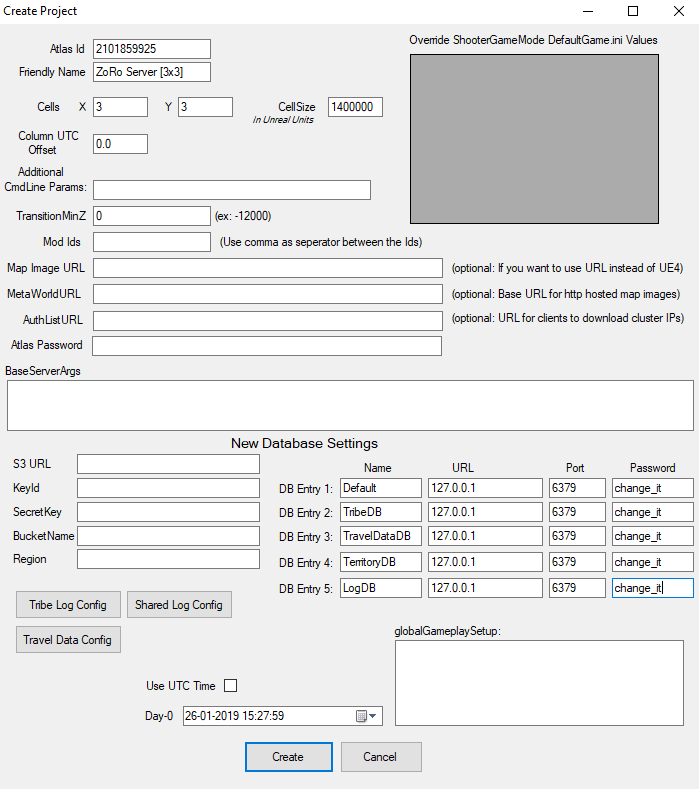
Open ServerGridEditor (You previously extracted it on your desktop) and select Create Project.
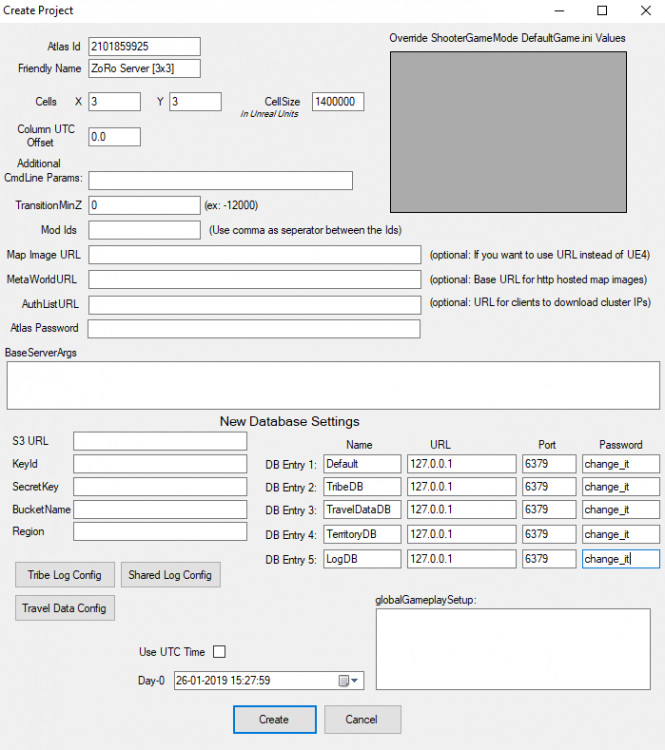
Complete like this :
Atlas ID : Let the software handle it, don't touch this.Friendly Name : The name that will be display in the Atlas servers list.
Cells :
- X : 3
- Y : 3
CellSize : 1400000 IMPORTANT : Do not put more than this number or your map will be completely bugged. This is a Unreal Engine problem not an Atlas problem.
Column UTC Offset : 0,0New Database Settings :
- Change the default password foobared by another password (put the same password everywhere) and also note it on a bloc note, you will need it later.
- Do not change the Port, the URL and the name of any Entry.
For all others parameters, let them empty.
Then press Create.
3.2 Islands Creation
To help you, there're some shortcut :
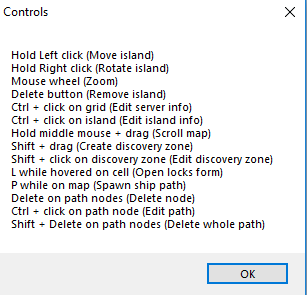
To add an island, just drag and drop the island from the list on the right to the correct grid. As you can imagine, you have many island and their name are not chinese name
but it's a convention.
Island Naming Convention ISLANDTYPE_ISLANDSHAPE_CLIMATE_VARIANT Example Mnt_E_ET_B There you will find each type of island with their Climate Type and also the island reserved for FreePorts. You will also find 9 island called XXXX_PVE, those island are also called Golden Age Ruin where there're boss on it (Dragon, Hydra) and also Fountain of Yourth.
Free Ports Cay_H_WR_E Cay_K_TR_E Cay_J_EE_E Mnt_A_WU_E Mnt_F_ET_E Mnt_J_WT_E Mnt_L_CH_E Mnt_O_CL Climate Code Climate Type CH High Desert CL Low Desert CP Polar EE Equatorial ET Eastern Temperate PO Polar TR Tropical WF West Temperate WR West Tropical WT West Temperate WU West Tundra ER East Tropical Map Lettering Designators Polar PO CP Tundra WU Temperate WF WT ET Tropic WR TR ER Desert CH CL Equatorial EE Polar West Tundra West Temperate East Temperate Tropical West Tropical East Tropical Equatorial High Desert Low Desert CP WU WF ET TR WR ER EE CH CL PO WT # By Type 1 21 20 16 37 14 41 18 19 19 33 # By Type 2 5 5 Total 26 20 21 37 14 41 18 19 19 33 248 MNT_E_CP MNT_A_WU MNT_A_WF CAY_E_ET CAY_A_TR CAY_A_WR CAY_L_ER CAY_A_EE MNT_A_CH CAY_E_CL MNT_E_CP_B MNT_A_WU_B MNT_B_WF CAY_F_ET CAY_F_TR CAY_E_WR CAY_N_ER CAY_A_EE_B MNT_A_CH_B CAY_G_CL MNT_E_CP_C MNT_A_WU_C MNT_C_WF CAY_H_ET CAY_G_TR CAY_E_WR_B CAY_O_ER CAY_C_EE_PVE MNT_C_CH CAY_G_CL_B MNT_E_CP_D MNT_A_WU_E MNT_D_WF CAY_N_ET CAY_GB_TR CAY_F_WR ISLET_A_ER CAY_E_EE MNT_C_CH_B CAY_G_CL_C MNT_H_CP MNT_C_WU MNT_E_WF MNT_A_ET CAY_H_TR CAY_G_WR ISLET_A_ER_B CAY_E_EE_B MNT_D_CH CAY_H_CL MNT_H_CP_B MNT_D_WU MNT_I_WF MNT_B_ET CAY_I_TR CAY_H_WR ISLET_A_ER_C CAY_F_EE MNT_E_CH CAY_H_CL_B MNT_H_CP_C MNT_E_WU MNT_J_WF MNT_C_ET CAY_J_TR CAY_H_WR_E MNT_D_ER CAY_F_EE_B MNT_F_CH CAY_I_CL MNT_H_CP_D MNT_F_WU MNT_JB_WF MNT_C_ET_B CAY_JB_TR CAY_I_WR MNT_E_ER CAY_G_EE Mnt_G_CH CAY_I_CL_B MNT_I_CP MNT_J_WU MNT_K_WF MNT_C_ET_C CAY_K_TR_E Cay_I_WR_B MNT_F_ER CAY_H_EE MNT_I_CH CAY_I_CL_C MNT_J_CP MNT_J_WU_B MNT_L_WF MNT_C_ET_D MNT_A_TR CAY_J_WR MNT_I_ER CAY_I_EE MNT_J_CH CAY_J_CL MNT_J_CP_B MNT_J_WU_C MNT_LB_WF MNT_D_ET MNT_C_TR CAY_K_WR MNT_K_ER CAY_I_EE_B MNT_J_CH_B CAY_K_CL MNT_J_CP_C MNT_R_WU MNT_N_WF MNT_D_ET_B MNT_H_TR CAY_K_WR_B MNT_M_ER CAY_J_EE MNT_K_CH CAY_L_CL MNT_J_CP_D MNT_R_WU_B MNT_NB_WF MNT_E_ET MNT_JR_TR CAY_L_WR MNT_N_ER CAY_J_EE_E MNT_L_CH_B CAY_L_CL_B MNT_T_CP MNT_R_WU_C MNT_O_WF MNT_E_ET_B MNT_L_TR CAY_L_WR_B MNT_N_ER_B CAY_K_EE MNT_L_CH_E CAY_M_CL MNT_T_CP_B MNT_R_WU_D MNT_OB_WF MNT_E_ET_C CAY_M_WR MNT_O_ER CAY_K_EE_B MNT_M_CH CAY_M_CL_B MNT_T_CP_C MNT_T_WU MNT_P_WF MNT_E_ET_D CAY_N_WR MNT_O_ER_B CAY_L_EE MNT_N_CH CAY_N_CL MNT_T_CP_D MNT_W_WU MNT_F_ET CAY_O_WR MNT_Q_ER CAY_N_EE MNT_O_CH CAY_O_CL MNT_Y_CP MNT_W_WU_B MNT_F_ET_B MNT_A_WR MNT_U_ER_PVE CAY_O_EE MNT_R_CH_PVE MNT_A_CL MNT_Y_CP_B MNT_X_WU MNT_F_ET_C MNT_B_WR MNT_C_EE MNT_Z_CH MNT_B_CL MNT_Y_CP_C MNT_Y_WU_PVE MNT_F_ET_D MNT_C_WR MNT_C_CL MNT_Y_CP_D MNT_F_ET_E MNT_C_WR_B MNT_C_CL_B Mnt_G_ET MNT_C_WR_C MNT_D_CL ICE_A_PO ISLET_A_WT Mnt_G_ET_PVE MNT_D_WR MNT_E_CL ICE_B_PO ISLET_A_WT_B MNT_H_ET MNT_D_WR_B MNT_F_CL ICE_C_PO ISLET_A_WT_C MNT_J_ET MNT_E_WR MNT_F_CL_B ICE_D_PO MNT_J_WT_E MNT_J_ET_B MNT_F_WR Mnt_H_CL ICE_E_PO MNT_S_WT_PVE MNT_K_ET MNT_F_WR_B MNT_I_CL MNT_K_ET_B MNT_F_WR_C MNT_J_CL MNT_M_ET MNT_F_WR_D MNT_K_CL MNT_N_ET Mnt_G_WR MNT_L_CL MNT_O_ET Mnt_G_WR_B MNT_M_CL MNT_H_WR MNT_O_CL MNT_J_WR MNT_R_CL_PVE MNT_K_WR MNT_L_WR MNT_M_WR MNT_N_WR MNT_O_WR MNT_W_WR MNT_W_WR_B MNT_X_WR_PVE I have found a bug with the ServerGridEditor that occur when :
You add a new island on your map, you export it and put it on your server. You start your server, the island work properly. BUT if you want to move the island again you will need to remove it and place it again on the grid because if you don't do that, the island will be completly bugged when you will re-launch your server with the new position. You won't be able to farm any ressources and have some collision bug with rocks etc.
3.3 Discovery Zone CreationTo create a discovery zone just press Shit + Left Click and expand it to do a square. To configure it also do a Shit + Left Click on the yellow square :
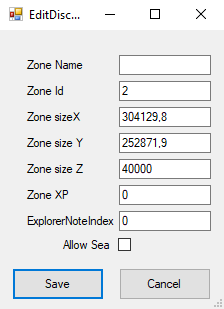
Zone Name = The name of the Discovery
Zone ID = ID of the discovery (The soft handle it directly)
Zone XYZ = height and width of the zone.
Zone XP = The XP obtened when a player find this Discovery Zone.
ExplorerNote = The index of the explorer note (more info to come)
Allow Sea = Check to allow the player to discover the discovery zone from the water (else he must go on the ground to discover it)
Also note, since v15.61 there's a server side parameter to configure how many point a player can gain per discovery :
Game.ini:

[/script/shootergame.shootergamemode]

MinPointsPerDiscoveryZone=3
3.4 Template Creation (Biome)
I highly recommend to use the default template from the official server. To find them open the file Projects/ServerGrid.json with another ServerGridEditor then Edit -> Edit Server Template -> Select a Template and click Edit. On your other ServerGridEditor, Click Edit -> Edit Server Template -> Add -> Then copie EVERYTHING you see in this window (Example with the Polar template) :
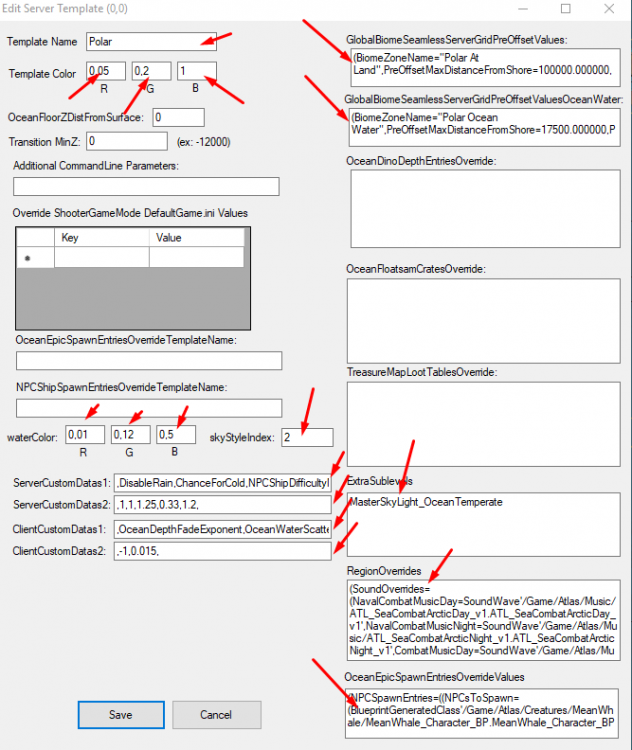
As you can see, there're some parameters called ServerCustomDatas1, ServerCustomDatas2. In these fields you can set all these options (and maybe some others) :
ServerCustomDatas1:
,DisableRain,ChanceForCold,NPCShipDifficultyMult,NPCShipDifficultyLerp,FloatsamQualityMultiplier,RainIntervalMultiplier,DisableFog,FogIntervalMultiplier,DisableClaimFlags,NPCShipNumMult,
ServerCustomDatas2 :,1,1,1.25,0.33,1.2,0.36,1,0.36,1,1,
There are 6 template on the official map: Polar, Temperate, Equatorial, Desert, Tropical, Tundra
3.5 Server EditionTo edit a server : Ctrl + Left Click on a grid :
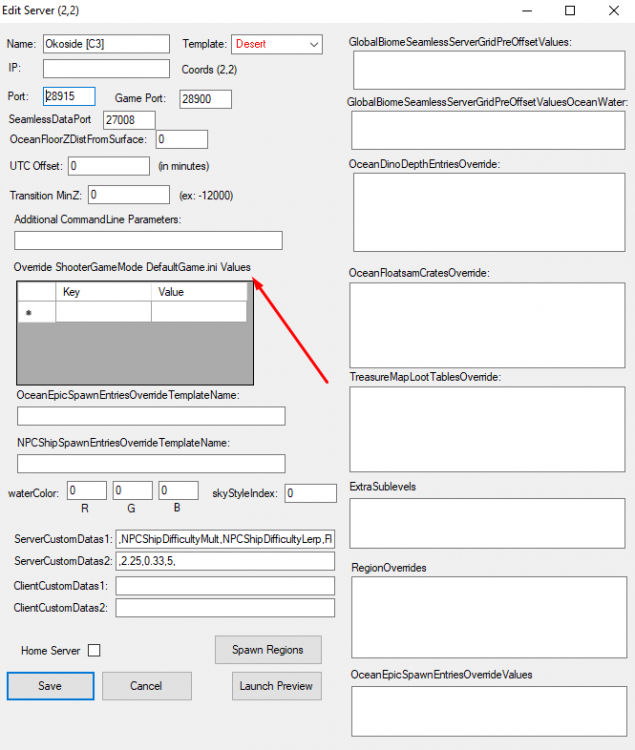
Name : Name of the server
Template : The template of the server (biome)
IP : The public IP fo your server
Port : The port of your server
Game Port : The game port of your server
SeamlessDataPort : This is handled by the software, do not touch this, BUT verify that no other server has the same port.
As you can see with the red arrow, you may also add some configuration from the Game.ini directly in the server configuration, for example :
Key : bDontUseClaimFlags
Value : 1 (for true or 0 for false)
You can also overwrite the ServerCustomDatas 1 and 2 from the template you linked to the server.
You will need to edit all the servers and add at least an IP, Port, Game Port and verify the SeamlessDataPort.3.6 Ship path
Press P on the map to create a Ship path :
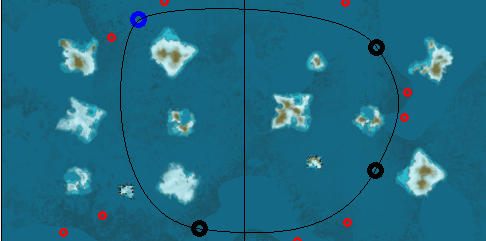
To add a node, put your mouse over an existing node then press Num+ or Del to remove it. To change the path with the red circle, put your mouse over the node and press Right Click then move on the map while still pressing Right Click.
To edit the Ship path : Ctrl + Left Click :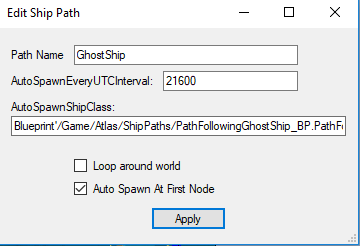
There're 2 Ship path option :
The Ghost Ship and the Trader Ship.
Ghost Ship configuration :- Path Name : GhostShip
- AutoSpawnEveryUTCInterval : 21600
- AutoSpawnShipClass : Blueprint'/Game/Atlas/ShipPaths/PathFollowingGhostShip_BP.PathFollowingGhostShip_BP'
- Loop around world : Loop around the node (not sure)
- Auto Spawn At First Node : Checked
Trader Ship configuration :
- Path Name : NPCTrader1 (1 to 9)
- AutoSpawnEveryUTCInterval : 0
- Auto Spawn At First Node : Checked
3.7 FreeportFirst you will need to add special freeport island to your server : (Up to 4 island MAX per freeport server)
Free Ports Cay_H_WR_E Cay_K_TR_E Cay_J_EE_E Mnt_A_WU_E Mnt_F_ET_E Mnt_J_WT_E Mnt_L_CH_E Mnt_O_CL
When you have added your 4 island, Edit the Server configuration (Ctrl + Left Click on the server grid) :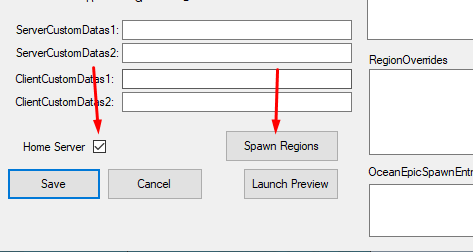
Check Home Server then Click on the Spawn Regions button then add this :
Name | Parent Cell
Northern Island | 0,2
Eastern Island | 0,2
Southern Island | 0,2
Western Island | 0,2
The Parent Cell correspond to the grid X,Y Example, If you want to put your freeport in A1 than put 0,0.
3.8 Export
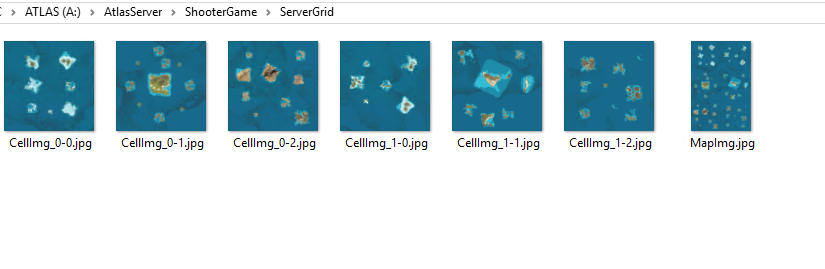
To export it, simply click Export then Local Export All. The files will be exported in the directory ServerGridEditor/Export.
You will have 2 files and 1 directory (for a 3x3 map) :
ServerGrid- CellImg_0-0.jpg
- CellImg_0-1.jpg
- CellImg_0-2.jpg
- CellImg_1-0.jpg
- CellImg_1-1.jpg
- CellImg_1-2.jpg
- CellImg_2-0.jpg
- CellImg_2-1.jpg
- CellImg_2-2.jpg
- MapImg.jpg
ServerGrid.json
ServerGrid.ServerOnly.jsonI have read many post about the map being black, and some people tell to rename those file into jpeg or to add an external link to the ServerGrid.json with the "MapImageURL": "" option, but most of the problems can be resolved simply by adding the PUBLIC IP to the paramater SeamlessIP in the launch start command. (I also got this problem so i know what i'm talking about
 )
)
↓ The tutorial continue below ↓
-
Did you tried to delete the ocean.atlas file of this grid ? A:\AtlasServer\ShooterGame\Saved\A1_0-0\ocean.atlas
Do not delete the redis_atlasdb.rdb, it will delete all characters on your all servers and it won't delete any structure. -
This line in your screenshot is totally normal. I don't see anything wrong here.
-
2 hours ago, Kaitlynn Allen said:No difference for me.
I have a 9 server cluster for 5 players (just some friends and I)
It is running on my old games machine, a I7 4470K, onboard graphics and 8Gb DDR3 2400. With this config I could only get 7 servers to load (I wasn't surprised) and CPU usage seemed ok.
I splashed out and bought 32Gb of DDR3 1333 (I couldn't afford anything higher), all 9 servers load and run fine, when settled using about 15Gb with 3 of us on the same server. However, my CPU usage is now showing 100%, but oddly the game runs really smooth. I can even open Firefox with several tabs and the game still runs really nice.
Therefore, I am very confused, why such high CPU usage without the game being laggy?
I'm very suprised you can run 7 servers with only 8Gb DDR3. The screenshot i posted in my previous post was on a server with a Intel i7-7700K OC and 64Go DDR4 2400 and i'm using 46% of the memory with only 6 servers.
-
Yeah i forgot to mention i have set this option to NetServerMaxTickRate=15.
-
-
A:\AtlasServer\ShooterGame\Binaries\Win64\ShooterGameServer.exe Ocean?ServerX=1?ServerY=2?AltSaveDirectoryName=B3_1-2?MaxPlayers=30?ReservedPlayerSlots=0?RCONEnabled=True?RCONPort=28630?QueryPort=28615?Port=28600?SeamlessIP=XXX.XXX.XXX.XXX?ForceAllStructureLocking=true -log -server -NoBattlEye
5 PLayers connected on the screenshot.
Did you tried without BattlEye ? -
6 minutes ago, Patcher said:Yes, They spawn in level 50 and can gain additional 80 levels. You can make it so they gain more levels as well, but i just chose 80
That's nice ! And what configuration did you changed please ?
-
11 minutes ago, Patcher said:On my server we have dinos that are level 130. I can go higher but I want to keep it balanced. They also spawn in level 50.
But when they are tamed, can you level up them ?
Also what configuration key /value did you changed please ?
-
Thanks for your reply.
Yeah so it's a bit bugged atm, i will wait till they fix that.
-
As far as i know, you can't do that.
-
2 hours ago, survival said:I changed the port 27000 by 27020 and it continues without showing the map
Can you post the command generated by the software please ?
Most issues about the map grid are related to the SeamlessIP missing or missconfigured.
I posted a comment about that there :-
1
-
-
MNT_D_WF : Emerald
MNT_E_CP : Opal
Mnt_G_CH : Emerald
MNT_H_CP : Sunstone
MNT_N_ET : Ruby
MNT_Q_ER : Ruby
MNT_T_CP : Sunstone
MNT_Y_CP_D : Diamond
MNT_S_WT_PVE : Emerald
And probably some others -
On 1/16/2019 at 3:52 PM, homi231 said:from the youtube tutorials it says you dont have to setup The redis just install and letsgo thats what i did can you be more spezific about what you say ?
Open the file ServerGrid.ServerOnly.json go to the bottom and make sure to change the passwords like below : (PUT THE SAME PASSWORD FOR ALL THE CONFIGURATION)
"DatabaseConnections": [
    {
      "Name": "Default",
      "URL": "127.0.0.1",
      "Port": 6379,
      "Password": "YOUR_PASSWORD"
    },
    {
      "Name": "TribeDB",
      "URL": "127.0.0.1",
      "Port": 6379,
      "Password": "YOUR_PASSWORD"
    },
    {
      "Name": "TravelDataDB",
      "URL": "127.0.0.1",
      "Port": 6379,
      "Password": "YOUR_PASSWORD"
    },
    {
      "Name": "TerritoryDB",
      "URL": "127.0.0.1",
      "Port": 6379,
      "Password": "YOUR_PASSWORD"
    },
    {
      "Name": "LogDB",
      "URL": "127.0.0.1",
      "Port": 6379,
      "Password": "YOUR_PASSWORD"
    }
  ]
DO NOT CHANGE anything else in it.
After that, go to A:\AtlasServer\AtlasTools\RedisDatabase\redis.conf and edit it. Search for requirepass you should have something like that :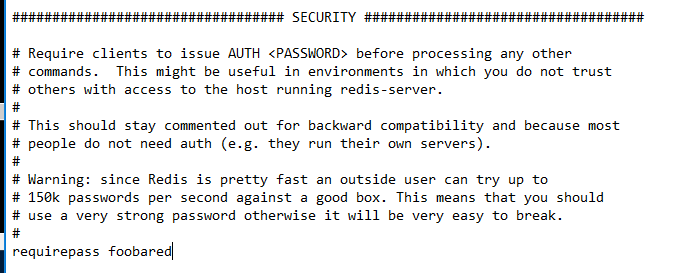
put the SAME password you did in the ServerGrid.ServerOnly.json file then relaunch Redis and your servers.
-
On 1/12/2019 at 7:31 PM, Felenk said:I have a private 2x2 and everyones Maps work, just have blank treasure maps. I've tried everything to include the destroywilddinos, verified ports 0,0 57555 5755 27000, 0,1 57557 5757 27004, 1,0 57559 5759 27008, 1,1 57561 5761 27012. Also, I used the latest editor with JPG to creat this 2x2.
Any ideas or suggestion would be welcome.
Thanks!
Hey,
I got this problem too when i installed my server. And the problem was an IP not being configured correctly.
Here is the command to launch one of all server :
start A:\AtlasServer\ShooterGame\Binaries\Win64\ShooterGameServer.exe Ocean?ServerX=0?ServerY=2?AltSaveDirectoryName=A3_0-2?MaxPlayers=30?ReservedPlayerSlots=0?RCONEnabled=True?RCONPort=28330?QueryPort=28315?Port=28300?SeamlessIP=XXX.XXX.XXX.XXX?ForceAllStructureLocking=true -log -server -NoBattlEye
In this command there's something very important, it's the SeamlessIP=XXX.XXX.XXX.XXX option. You must have it in your command and your MUST put the PUBLIC IP, not the internal IP (127.X.X.X).
Also, in your ServerGrid.json, for each grid you should have an option called "seamlessDataPort": XXXXX, the soft handle it directly you should do nothing about that, only control that the option is here for each grid and each port is UNIQUE for each grid. Basically the ports will be 27000, 27001, 27002 etc
About the images name, DO NOT CHANGE their name :
-
Hey,
First save the file C:\AtlasServer\AtlasTools\RedisDatabase\redis_atlasdb.rdb where you want, then delete it and relaunch your server, all the characters on your servers should be deleted.-
1
-
-
On 1/17/2019 at 6:28 AM, Dinoshark said:I want to run a 3x3 with a bunch of friends and I was wondering what type of specs would you need to run it? We have a bunch of spare parts around but we only have ddr3 ram would that still work?
I have a server GAME-64-OC - Intel i7-7700K OC - 64GB DDR4 2400 MHz - Hybrid Soft RAID 2x450GB NVMe + 4To SATA from OVH, and i run perfectly a map in 3x2 (custom map made by me) with ~ 15/20 players on it.
Here is the Task Manager from the server : (Only 2 players connected when i took the screenshot)
-
Hey,
For the first one, you can't do it ONLY for an isle.
For the second, i would like to know too. (It's 3 days actually for info) -
Hey,
Actually the max level for a dino to be tamed is the level 30 (Can't tame higher than 30, tested and approved).Does someone know a configuration option to change that ? @Jatheish
I have think about the DifficultyOffset option to up but i don't know if this option is implemented and if that will up the max level of 30.


[TUTORIAL] HOW TO SETUP A DEDICATED SERVER WITH MAP CREATION 3x3
in Guides
Posted
I didn't know about this soft, i will take a look thanks !