

Simonsays095
-
Content Count
15 -
Joined
-
Last visited
-
Days Won
2
Posts posted by Simonsays095
-
-
On 8/22/2020 at 11:10 AM, antihax said:L1 Ship 6 full cargo racks 48k weight (in racks) 125% handling 11.01 knots Speed sails 11.88 knots 156% weight 8.52 knots 256% weight 8.72 knots L47 Ship Weight Leveled 6 full cargo racks 48k weight (in racks) Speed Sails 14.10 knots 241% weight 8.9 knots L47 Ship Weight Leveled No racks 48k weight (on boat) 241% weight 11.15 knotsCouple data points including different sails with same boat configurations and max wind.
As of this point in time, speed sails are fastest, 125% accel handling following that, then base handling.
Weight sails are pointless with the introduction of cargo racks; their base speed is too slow for the weight bonus to be effective, even at high bonus rates.
@antihax As i mention... somewhere... Cargo racks and speed sails are independent of each other. There are certainly cases where using both will make your ship faster. But I agree that in general, cargo racks should be used first because their speed increase is far more drastic. However, at very high weights (say, more than 80%) weight sails can make a huge difference. But at that weight, you should certainly have all 6 cargo racks on.
A good question would be why anyone would be sailing at 80% weight even with 6 full cargo racks... -
Hey @SeroJ
I didn't mention handling sails anywhere on this post. I do have another guide that shows what they can do, but it's really beyond the scope of this post. As a brief overview, though, handling sails are 20% slower than speed sails, but higher acceleration on handling sails will increase the max speed. This means that you can get handling sails that make your ship faster than with speed sails.There has been no recent nerf, it's just a complicated topic. Schooners are more easily loaded down than brigs, but they go faster when unloaded and with optimal sail arrangments. It's all a tradeoff, and without specifying the sail layout, ship type, and total weight, you can't easily say if one ship should go faster or slower than another.
If you give me more info, I can happily use the info in this post to tell you what your max speed should be, compared to those brigs you're talking about.
-
 1
1
-
-
14 hours ago, pfg said:Is it ever better to add a weight sail rather than a cargo rack.
13 hours ago, Kummba said:Otherwise weight sails should only be used for when the weight can not be put into racks. Like cannon ship and transporting alot of tames.
Just to clarify this point, weight sails and cargo racks are completely independent of each other. When you should add each one depends almost entirely on your ship weight percentage. As @Kummba points out, cargo racks are only useful when you actually have the free weight available to put into a rack, whereas weight sails will increase the speed of your ship by increasing the maximum weight. However, the math behind weight sails does not care about how many cargo racks you put on, and vice-versa for the cargo racks. Therefore, the numbers I put in here for when to add weight sails and the numbers in the cargo rack post are correct no matter the number of weight sails or cargo racks you have on the ship.
Thus, you shouldn't think about this like "weight sails OR cargo racks", but rather "weight sails and cargo racks", which means that you should never substitute a cargo rack for a sail or vice-versa. They should be used together for optimal efficiency.
14 hours ago, pfg said:We know the speed parameter doesn't work on speed sails but what about all the other bonus parameters.
I have not tested this mechanic, but I definitely see myself tackling blueprints in a separate post in the future. Of course, if/when I get around to doing it, I will add a link to this post for people with this question. Thank you for asking!
-
Introduction
For this forum post, I thought I would cover some of the wind mechanics. I think this will conclude my discussion of the wind mechanics (unless anyone can think of something else to test!) that started with ship weight and cargo racks (somewhat related to wind mechanics) and continued to my discussion of the sextant buff. Once you finish reading the guide, you should have a very good idea of how to efficiently travel around the ATLAS, armed with the knowledge of the invisible force in ATLAS that allows ye' scallywags to explore the open ocean - the wind!
To organize the post a bit, I will try to progressively get into more of the details toward the end of the guide, and reserve the beginning as a summary for people who don't really care about the details. I will summarize the main points in the "Big Questions" section, and most of the discussion will be in "The Bulk" section. For those interested in the intricate details with how I did my testing, I will leave most of that to "The Details" section.
Big Questions
-
How do the different types of sails (speed, handling, and weight) differ?
- The sails differ in the effective angle and maximum speed that they can give the ship. Speed sails give more maximum speed than the other two sails, and handling sails give a larger effective angle than the other two sails. Weight sails have the same effective angle as a speed sail, but they contribute much less to the maximum speed than speed sails - in return, they will add maximum weight to your ship.
-
When should I use one type of sail over another?
- Weight sails should only be used when the ship is very overweight. As a rough estimate, put on the first weight sail around 65%, and add more weight sails every 7% weight you add on from there. Handling sails are faster than speed sails only when you are sailing against the wind (up to 27 degrees either direction from directly against the wind). The benefit with handling sails is that you will never bottom out on speed, unlike speed and weight sails which bottom out quite easily. However, if you aren't making a ship specifically to sail against the wind, speed sails are more widely applicable, just use them.
-
How does the wind rotation work?
- The wind rotates in a large circle at a constant speed. It takes about 5 real-life hours (+/- 5 minutes) for the rotation to complete, and it goes through 2 full-wind/low-wind cycles every time. That means that if you are currently in low wind, wait 75 minutes, and the wind will be strong. Furthermore, the strong winds only point North or South, and the weak winds only point East or West. If you have the luxury to plan multiple bases far apart, this means that it will be easier to get back and forth between them if you put them close to the same column (vertically).
-
Does sail angle affect ship speed? How about wind angle within the effective angle?
- Unlike in real life, the angle that your sails make to your ship's body make NO difference to your speed. The only angle that changes your ship speed is the angle between your sails and the wind. As this angle increases, the ship speed steadily decreases, even at small angles within the effective angle. Similarly to how weight effects your ship speed (in-depth discussion here), the speed drops off very quickly as you approach the effective angle. Therefore, it is wise to minimize the angle between your sails and the wind whenever possible.
Related questions that I will not be answering in this post:
- How does ship weight affect the speed of the ship?
- How accurate are the numbers that the sextant buff gives you?
The Bulk
1. How do the different types of sails differ?
All sails have 5 values that dictate their differences: Maximum weight addition, effective angle, acceleration, maximum speed, and turning effectiveness. I mainly tested what I believe to be the most important values, and I may update this post in the future to discuss the acceleration and turning effectiveness, which only affect the handling sails. The rest of this discussion talks about the maximum weight increase, maximum speed, and effective angle of each type of sail.
Speed Sail: Speed sails have an effective angle of about 82 degrees, and by far have the fastest maximum speed of any sail type. In addition, they don't add any maximum weight to your ship - they are the simplest and most reliable type of sail in the game.
Weight Sail: Like speed sails, weight sails have an effective angle of 82 degrees. However, they produce less maximum speed than speed sails (about 60% speed) in return for increasing the maximum weight of your ship. Small weight sails will increase the maximum weight by 1,000 kg, medium sails will increase it by 2,500 kg, and large sails will increase the maximum weight by 4,000 kg.
Handling Sail: Handling sails have the largest effective angle of any sail in the game, at around 118 degrees. Their speed is between the speed of weight sails and speed sails (around 75% of a speed sail's max speed), but they have the fastest open/close times of any sail, and they also rotate faster than the other sails.
Side note: Since the angle of the sails to the ship body doesn't matter, and the sails can be rotated to +/- 75 degrees, you can always reach a max speed for the first 75 degrees by rotating the sails. After that is when the effective angle starts kicking in, and you will bottom out on speed at 157 (82+75) degrees with a speed sail, and 193 (118+75) degrees with a handling sail. Since 180 degrees is straight behind you, this means that you will never bottom out on handling sail speed unless you purposefully point your sail in the wrong direction. Speed sails, however, have a 46 degree arc toward the rear of the ship where you can bottom out in speed no matter what you do.
2. When should I use one sail type over another?
 In typical sailing conditions, speed sails are almost always faster than weight or handling sails. Unless you like the feel of sails opening and closing quickly, I would argue (although this is speculation, I haven't done the math on this) that speed sails are always better than handling sails, when used optimally. As for why I haven't done the math on this, consider the following complication: Handling sails are faster than speed sails only past 153 degrees. That gives you a 54 degree window for which handling sails would be better. However, it might be faster to just adjust the angle you sail at to make the speed sail faster, and then tack back toward your destination when you get closer. It makes your trip longer, but you also go faster.
Weight
 sails have a bit more utility for hauling large loads. However, they only add a fixed amount of ship weight (not a percentage), so they are relatively less beneficial as you put points into weight. Additionally, you can split up your haul into 2 trips if you really have to carry a lot, and that may even speed up your haul time. In general, it is beneficial to add your first weight sail at 63% weight, and then add another one every 8% weight you add after that. If you have not read my guide regarding cargo racks, I highly recommend you read that if you have a heavy ship. At any weight that you would consider using weight sails for, you should also be considering cargo racks, unless you have a lot of weight that you cannot put in cargo racks (such as cannons and cannonballs).
This is a section that I can definitely do a bit more testing and mathematics (trigonometry, here I come), so I will be updating this in the future. Until then, much of the notes in this section are speculation based on dozens of hours of testing these mechanics. Trust them or don't, it's up to you.
3. How does the wind rotation work?
 The wind rotation is locked into the cardinal directions - strong winds always go North or South, whereas weak winds always go East or West. Furthermore, the rotation is locked into the clock as well - strong winds always happen at Noon and weak winds always happen at Midnight. There is a day in between strong and low wind, so if you have strong wind (at Noon on some day), the next low wind happens at midnight the following day, 1.5 days later. If you currently have low wind, just wait 1.5 in-game days for the next strong wind period. Since one in-game minute is 2.1 seconds (see my sextant buff post for more details), This means you should wait for 75 minutes to get the opposite strength of wind.
The wind strength does not change consistently over the course of the rotation. From Noon on the day before the weakest wind until Noon on the day after the weakest wind (for a total of 1 in-game day), the wind strength drops to the minimum and then rises very quickly, starting and ending at about 50% wind strength. Therefore, most of the time the wind is above 50% strength, and if you find yourself caught in a low wind period, you only have to wait until the next Noon for the wind to become strong again. Pull over, feed your animals, pay your crew, and you can be on your way again in no time!
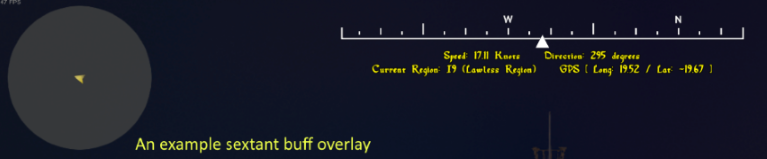
The image on the left shows how the wind strength arrow changes over time, with the in-game time overlaid around the image to show you how fast it rotates. You can see in this image why you should wait for the next Noon after a low wind - that is when the wind starts picking up again!
4. Does sail angle affect ship speed? How about wind angle within the effective angle?
As long as your sails are pointing with the wind, the angle your sails make with the body of your ship does not affect your speed. Therefore, only the angle between your sails and the wind makes an impact on your speed.This angle makes a big difference in your speed as you get close to the effective angle. For example, if you are 75% of the way to the effective angle, you still have about 61% of your max speed. Once you reach 90% of the way to the effective angle, though, your speed drops to 44% of your max speed. At 95% of the effective angle, you only have 35% of your speed left.
Wind-sail angle effects your ship in a very similar way to weight. The biggest difference is that when you reach the effective angle, you go a minimum speed of 29% of the max speed. However, because of the very fast drop-off of speed as you approach the effective angle, it is generally wise to not get anywhere near it. In-game, this means that you should avoid sailing in a direction that makes your sails turn red in the HUD indicator, and think a bit about your heading if your sails are dark orange. It may be wiser to turn a little more with the wind, and then cut back in the other direction (tack) when you get closer to your destination.
The Details
Testing Details
All numbers in this guide were obtained through testing in single player, and confirmed (somewhat) using the numbers in the devkit. It is hard to convert the numbers in the devkit into actual usable in-game numbers, but I did my best. If anyone is familiar with the devkit and would like to give me a tutorial, I would love to talk to an expert, just message me and I will give you my details.
For the most part, the tests I ran involved getting the sextant buff, then equipping a ship with a specific sail configuration and sailing it across H8 (no islands, so I can stay within a single grid and get about 19k meters of testing space, along a diagonal). Once the knot display reached a stable speed, I recorded the time, latitude, longitude, and speed in knots, given by the sextant buff. I recorded this data again at the opposite end of H8, and computed the total distance traveled and the time in game-minutes it took to travel that distance (in longitude units). I then converted this speed in long/game-minutes into ATLAS knots (see my sextant buff post for details).
For the effective angle calculations, I had to do something slightly different. I aimed my ship as close to true North as I could. This involved setting the wind direction (using setdir 90) to North and the wind speed (using setwind 12) to the maximum strength, and rotating my ship until the wind arrow had no pixels off of the directly vertical line. I verified my (very close to) true North heading by sailing some time and noticing no change in the longitude coordinate. In fact, for much of my testing, my ship could lean left and show one longitude and lean right to show another, 0.01 higher. Because this lasted a long time, I am fairly confident in my heading being essentially true North.
With my ship and sails pointing due North, I set the wind to many different angles away from North (using setdir X), and recorded long/lat/time like before. However, there is the added complication of crossing server borders. I kept track of the time as I crossed borders (only going North, remember, not East or West), and there was no time gained or lost. The coordinates were a different matter - when you cross a border (at least in Single player), the game puts you at 0.14 longitude units further than you entered. I just had to keep track of how many borders I crossed and subtract 0.14 for each one. This added some error, but I couldn't think of a better way to do the tests without rotating the ship between tests. If I did rotate between tests, the slight variation in the way my ship was pointing would make the effective angle very difficult to compute, since small changes in angle near the effective angle make a large difference in the ship speed.
Any derived numbers (like maximum speed contribution per sail) were obtained using the trendline function in Excel, or the Solver addon for Excel.
Detailed Numbers
I will put detailed information here about the specific numbers I obtained from testing. I will also update this section if I did some math that confuses anyone.
- Since the full wind rotation takes 6 in-game days, the wind rotates around at 60 degrees per in-game day, or 1.19 degrees per real-life minute. Additionally, the strength of the wind changes twice as fast in the "low wind region" from Noon before the lowest wind until Noon after the lowest wind. The graph below shows this region where the wind power changes much more rapidly.

- Weight and speed sails have an effective angle of 82.0305 degrees, and handling sails have an effective angle of 117.725 degrees
- The table below shows my current data on maximum speed from each type of sail, for each type of ship. I will be adding to this in the future, as I collect more data.

- Handling sails are faster than speed sails once you pass 152.59 degrees. At that point, you should switch all sails over to handling sails (if you can't just rotate a few degrees to make the speed sails worth it).
Conclusion
Generally, you will want to use speed sails, and only in rare cases will you want to use handling or weight sails, since their benefits don't outway the massive increase in speed that speed sails give. However, if the wind is just too weak and you are doing everything you can to milk speed out of your ship, you can always just wait for the next Noon, and the wind will be guaranteed to be at 50% and rising in strength. Finally, Avoid sailing in a direction that makes your sail HUD indicator dark orange, since your speed drops off very quickly as you get close to the effective angle, where the sails turn red.
Please leave a comment if you think I missed anything, and let me know if I have not explained something clearly enough. I am happy to answer DMs or regular comments. Finally, I would like to thank @Kummba for encouraging me to look into the wind mechanics, and giving me a jumping off point with the wind rotation mechanics.
See you on the high seas!
-
2
-
How do the different types of sails (speed, handling, and weight) differ?
-
1 hour ago, Realist said:what fortitude is needed for attic areas
I'm not sure what you mean by this - do you mean the Polar regions? The fortitude you need to survive there is different than the fortitude needed to guarantee that you will be safe from hypothermia. I think (sorry, not a precise number) that around 30 fortitude is a bare minimum fortitude to live somewhat comfortably (in fur) in the polar region.
1 hour ago, Realist said:the best 3x3 on the entire cluster as far as resources and where the best place to find certain tames are. As well as many other things.
There is no 3x3 cluster that I am aware of that has all the typical farming tames (Rhino, giraffe, elephant, and bear). The best candidates would almost certainly be in the corner of one of the biomes, so the 3x3 cluster would have 4 different biomes with different sets of resources and tames. For example, I know that the 3x3 cluster centered on E11 has many resources and tames. I would hesitate to say it is the best cluster, though, since I don't have information about tames and resources in each grid off the top of my head.
-
As I mentioned in the beginning of the post, I intentionally avoided discussion of weight sails (or handling sails, sail quality, etc.), to help keep the discussion focused somewhat. I do plan on making a guide in the future discussing all 3 types of sails together. Keep an eye out, it's coming soon!
-
2
-
-
I didn't know those numbers, so thank you for that!
Honestly, I didn't even think about the time changing when going E/W, so its a good thing I went North when doing the test.
 I did look at a scatter of position versus, so I hope I would have caught a jump in the graph when the time changed. In any case, this didn't factor into the calculations because I was lucky enough to go North.
I did zone, I think it was twice in total. Something like E5 to E3, or thereabouts. Thanks for taking an interest in making sure my results are accurate, the whole point is to get objectively true figures out to the public.
-
Your additional rule-of-thumb is true, but your comment about a hauling galleon needing to be less than 6k weight when empty (although ideal) is not generally true. I wanted this post to apply to everyone, no matter how prepared you are for hauling.
Imagine the following scenario: You have a battle galleon you just brought to the kraken fight, and you leave it overnight in a tile near the kraken. The next day, you get on, and someone is trying to dump weight, so they are giving away iridium (or residue, or insert another valuable resource here) - how much should you carry home with you? Your ship is not equipped for hauling lots of weight, but you should probably take some of it. This post will help you (by looking at the 10k fixed weight graphs, as a start), because we didn't just initially assume that your ship is empty to start. I even had a hard time assuming that we used a galleon (I had my code set up for any ship, and just included the graphs for a galleon).
14 hours ago, Kummba said:This is missleading alot (or hard to understand on the first glance), you could swich to extra load for x. The ~10k you talk about are 6*8k = 48K load. Otherwise nice graphs.
I think you misread this part. If you have 0 fixed weight, you should load up your galleon until your total weight is 12,530 lbs. If you have 10k fixed weight, you should load up your galleon until your total weight is 19,600 lbs. In both of these scenarios, it assumes that you are using the optimal arrangement of cargo racks, and they cam directly from the following graphs:

The optimal carry weight is when the graphs are at their highest point, and your ship's total weight would be the x-coordinate. You can see the first graph is maximal at around 12.5k ship weight (with all 6 cargo racks filled, plus a little more), and the 2nd graph is maximal around 19.5k ship weight (with all 6 racks just filled to the brim, no extra).
A bit of explanation of these graphs: Start at the bottom left, with an empty ship and no cargo racks. As you add weight, you go up and to the right, until the point where you should add the 1st cargo rack. At this point, the line goes straight left, since you are reducing ship weight without changing speed or items carried (so transfer rate stays the same). As you fill that cargo rack up, the line continue steeply upward and to the right. Once all racks are filled, the line continues up and to the right at about a slope of 1. Rinse and repeat until you have all 6 cargo racks on, and your slope decreases until it eventually just drops off completely, and your ship slows down due to too much weight.
For the 0 fixed weight case, you have all 6 cargo racks filled up (for a total of 6*1.5k = 9k weight in cargo racks), and an additional 3,500 lbs, for a total of 6*8000 + 3500 = 51.5k cargo. The 10k fixed weight just has 6 full cargo racks, for a total of 48k weight in cargo (which makes your ship weight 10k + 6*1.5k = 19k, as mentioned).
-
1
-
-
Thanks for your Praise, Kummba! Let's see if I can answer any of your questions:
12 hours ago, Kummba said:Never say never, the shorter way often takes more time! Know the wind.
Very true! I plan on doing a more in-depth analysis of the wind mechanic, similar in structure to this post, in the future. I will be sure to go into more depth with this discussion on that post. For simplicity, I ignored the wind mechanic for this discussion, and I will include a link to the other post for people that want to know more, once I make it.
12 hours ago, Kummba said:(1grid/6,5min)/20 is 0,0077 grids/RL min per knots. What is your fact here, what is derived?
The numbers I gave in the post are 6.5 minutes (at 20 ATLAS knots) per grid, and 0.077 lat/long per in-game minute. I got both of these numbers from the same test: I spawned a brig using ssf brigantine and then set it going at full speed in any direction. In my case, it was in the heading of 0, according to the sextant buff. Once the ship reached a constant speed, I took a screenshot and recorded the lat, long, in-game time, current sextant buff heading (which stayed constant), and speed reading (stayed at 22.57 +/- 0.01 knots). After about a half in-game-day of travel, recording this data every in-game hour, I stopped the test, and computed the total distance traveled using the usual distance formula, in units of lat/long units (I got 33.23455 lat/long traveled). Dividing this distance by the total time spent traveling (I got 431 in-game minutes), I got the speed of 33.23455/431 = 0.0771 lat/long per in-game minute. Converting this to real-life minutes per grid just take the conversion factor of 2.1 real-life seconds per in-game minute (which gives you the time of 50.4 minutes per in-game day, as you mentioned). Then we just do one line of algebra:
2.1 real-life seconds per in-game minute / 0.0771 lat/long per in-game minute * 13.333333 lat/long per grid / 60 seconds per minute = 6.05 minutes per grid (at 20 ATLAS knots)
This is all fact - I did a simple experiment and then computed the rest of the numbers directly. There is no guesswork or approximations, unless the numbers we are given for time, lat, or long are somehow flawed. I will rewrite this section adding this explanation to the post itself, for others that are interested in how I did the math/tests.
Thanks for your feedback!
-
INTRODUCTION:
The sextant buff is one of the most useful buffs in the game, so I figured a guide explaining how to get it, what it does, and what aspects of it you should not take for granted, would be quite worth it. I'll start by listing the questions I am going to answer, and then we'll get into the thick of the content.
The Big Questions:- What is the sextant buff, and how does it help?
- How do I get the sextant buff, and how long does it last?
- How large are the grids (and the whole ATLAS map), in terms of lat/long points or meters?
- When would crossing the edges of the map to get to another grid make my trip faster?
- How accurate are the speed, lat/long, and direction that the sextant tells you? What is an ATLAS knot?
Related questions other posts have answered, that I will skip here:
Read on for more detailed info on each of these topics!
What is the sextant buff, and how does it help?
The sextant buff is a buff that helps you navigate the seas. When you apply the buff, you will be given the following information as a HUD at the top of your screen:
- A compass showing the direction you are looking in
- A minimap of your surrounding area (able to be toggled on/off via the settings menu)
- What region you are currently in, including any special qualities of that grid (lawless, golden age ruins, etc)
- latitude and longitude coordinates of your current position
- When sailing a ship: The direction you are headed and your current speed in knots
- In-game map marker overlay and guidance. Left-click on an ATLAS map marker to activate an in-world guidance marker.
- minimap and ATLAS map player markers show the direction you are facing
Although the buff is indispensable in helping you navigate the seas, it is also very useful on land. I have used the sextant buff to help navigate an island due to the minimap that comes with it, as well as to line up my camera to the cardinal directions for building. Feel free to share in the comments if you have any creative ways you have used the sextant buff!
How do you get the sextant buff?
To get the sextant buff, you first have to unlock and get the sextant. The sextant is unlocked by the "Navigator's Tools" skill, which is the first skill in the Seamanship skill tree. It takes 11 skill points after a respec to get to this skill. Once you have it unlocked, you have to craft it with the materials shown in the wiki page. The sextant is a tool that you can use to get the buff. To use it, you will first need to get to a high location, typically the crow's nest of your tallest sail if you are on a ship. Hold right-click to bring the sextant up to your eyes, and start looking around for stars in the sky. They will still be visible in the day, and they will have a green diamond show up around them if you get close. Once the diamond shows up, left-click while continuing to hold down right click. This will add a star to your total, and 4 stars are needed to get the buff. Once you add a star to your total, a trail will lead from it to the next star. However, you have to try to be fast, since you only have a few seconds to find all of your stars. Here are a few tips:
- During the day, the first star tends to be near the sun (not rigorously tested)
- The trails that lead from one star to the next will curve if they travel a long distance, since they move on a sphere, which distorts their motion. Try to follow the curve around, or you will end up quite far from where the star actually is.
- Once you click on the first star, you will have 50 seconds to find your stars (+5 seconds for each cosmology level, then x1.10 for each level in able navigator skills)
- If you find 4 stars, you will get 1500 seconds (25 minutes) of sextant buff. Each star above that will give you +1180.6 seconds (almost 20 minutes) of buff, up to the 9th star and above, which give you a total of 7200 seconds (2 hours) of buff. NOTE: The able navigator skill currently has no effect on sextant buff duration, although it says it does. Be aware.
How large are the grids? How large is the whole ATLAS map?
Using the sextant buff's guidance marker feature and GPS coordinates, you can get very accurate information about the size of each grid. For example, the center of the center maw (where the Kraken spawns) is at the coordinates of 0/0 long/lat. Moving to the East increases longitude, whereas moving to the North increases latitude.
NOTE: Most real-world coordinates are given in lat/long notation, but the game chooses to give the coordinates to you in long/lat notation, so try not to confuse the two.
By using singleplayer to fly to the corner of a grid, then marking a waypoint at an adjacent corner and activating the guidance marker, you can get the following size for a grid
- 14,000 meters along a side, and
- 13 1/3 lat/long along a side.
This means that the whole ATLAS map is 14 * 15 = 210 km in width and length, and the maximum lat/long coordinates are +/- 100.
When would crossing the edges of the map make my trip faster?
The right edge of the ATLAS map is connected to the left, and the top is connected to the bottom, just like in Pac-man. Curiously, this means that the ATLAS map is not on a sphere, like our Earth, but rather on the surface of a torus (a doughnut shape). Since there are a total of 15 grids in each direction, you could go 8 tiles in one direction, or 7 tiles in the other direction to get to the same grid. Therefore, you should never go more than 7 tiles E/W or N/S to get to your destination. If your route takes you on a path with more than 7 tiles in one direction (for example, West), just go in the opposite direction (East) and it will be shorter.
- Never go more than 7 tiles in one direction (E/W or N/S) to get to your destination. Go the opposite way, and you can get there in under 7 tiles.
- The furthest grid from you on the map is 7 tiles E/W and 7 tiles N/S away from you, for a total of 9.9 tiles to get to the opposite side of the map.
How accurate are the numbers that the sextant buff gives you?
To start, I will assume that the long/lat numbers are exact, since they are simply related to the in-game coordinate system that the game invariably uses. From these numbers, we will discuss the accuracy of the sextant buff speed and direction numbers, and any relevant conversion factors.
First up: speed. In real life, a knot is defined as about 1.15 mph, or around 0.514 m/s. Using this number, and the fact that grids are 14 km in width, a ship going around 20 knots would take over 23 minutes to cross a grid. This isn't the case (you can traverse a grid much quicker), so the game must think that knots are something different. To test this, I started a brig off in a random direction at full speed, in singleplayer. Using singleplayer commands, I made the wind a constant speed and not rotate, and I sailed for about 1/2 of an in-game day, and computed the total long/lat distance traveled, compared to the speed shown in the sextant buff. I determined that 1 knot is equivalent to about 0.077 lat/long per in-game minute, or 0.347 grids/in-game hour. To convert in-game minutes to real-life minutes, you just have to divide by 2.1 (I got this number by timing with a stopwatch for about 10 minutes and figuring out how many in-game minutes passed by). Therefore, 1 ATLAS knot is about 38.56 meters/real-life second. Thus, a ship going at 20 knots can cross a grid in just over 6 minutes. Here are a few useful conversion factors:
- 1 ATLAS knot = 38.56 meters/real-life second = 0.0367 lat/long per real-life second = 0.165 grids/real-life second
- 1 in-game minute = 2.1 real-life seconds
- 1 lat/long = 1050 meters
NOTE: The speeds given by the sextant buff depend on your current CPU usage. If your CPU spikes, the speed will dip. I tested this by changing the slomo setting - as time is slowed down, the sextant buff indicator sped up. This is because the slower time allowed the CPU to rest more and keep up with the speed calculations. Additionally, I ran the user benchmark cpu test while playing the game at normal settings and similarly saw a drop in the sextant buff reported speed. I found that, for my game under typical settings and activity, the speed can increase by about 1% by slowing the game down absurdly, and it can slow down significantly when speeding the game up. Just a heads up - the speed is not universal, and the same ship may report different speeds on different PCs, even with all variables taken care of.
The second task: Direction indicator/heading. I first noticed that the direction indicator is off somewhat when I set my ship to head North (0 degrees) and found my longitude changing still. When I set the ship sailing in a direction that had no longitudinal changes (even over a very long period of time), the directional HUD said 1 degree. More of my testing included recording start and stop lat/long for my ship, and the direction of travel. I then computed the angle from the lat/long data, to compare to the given direction. I found that the direction is accurate to +/- 1 degree always. This can contribute to error when testing and trying to determine actual numbers for these things, but I doubt it will affect gameplay in any noticeable way. The biggest effect I could see this having is if you skirt along a grid border, you should look at the lat/long directly instead of the direction, since you could end up veering off course for long journeys.
Conclusion:
The sextant buff is a very useful buff, which is why I try to keep it on most of the time I play ATLAS. It helps plot a course on the sea, navigate a new island, or just stay oriented in your home base. Although the speed and direction have a few small accuracy issues, this shouldn't affect your gameplay at all unless you are crazy like me and want to dig up the numbers behind the game that make it all work.
That's it for this guide, let me know in the comments if there are any other sextant-related topics you want me to cover, or if you want me to make a guide on another subject that interests you. See you on the high seas!
-
3
-
Introduction
Looking around, I have found a need for a comprehensive guide on the most efficient use of speed sails, cargo racks, and long-distance resource hauling. Especially now that singleplayer mode allows for quick and easy testing, we need to get more factual information about ATLAS out to the public. For simplicity's sake, I will avoid discussing weight sails, handling sails, and item quality (maybe you can look forward to a guide on those subjects from me in the future).
Outline:
- TL;DR results
-
Answering individual questions
- Quick summary of results
- Explanation of singleplayer testing
- Summary
As a TL;DR, here are the questions I will be answering today and a quick summary of the answer:-
How do ship speed, sails, and weight work behind-the-scenes?
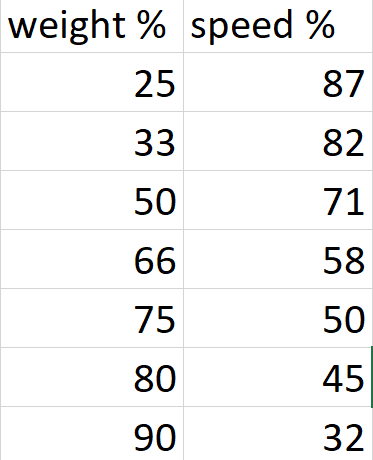
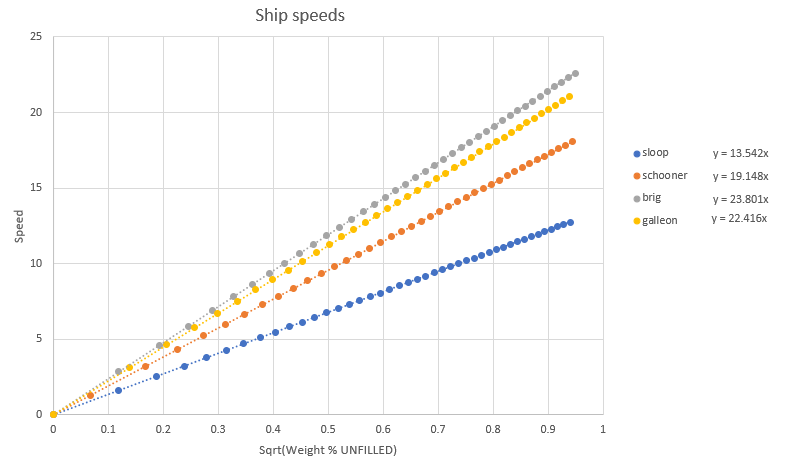
- Every ship has a max speed, if it theoretically weighed 0 lbs. Each sail you add contributes to the max speed, linearly. The speed is related to the square root of the percentage of your ship weight that is not filled. The following table has a few notable percentages (the speed % is compared to the max speed).
-
For each type of ship, what speed sail configuration (small/medium/large) gives the fastest ship?
- sloop: 1 medium and 1 small speed sail
- schooner: 1 large and one small speed sail
- brig: 3 large speed sails
- galleon: 6 large speed sails
-
What ship is the fastest?
- Contrary to popular belief, with optimal sails, galleons are the fastest, followed closely by schooners, and then brigantines and finally sloops (rafts aren't real ships :P).
-
How many cargo racks should I put on my ship to get the fastest ship?
- This is a very complex question that depends on your ship type, the total weight you want to carry, your max weight, and the "empty" weight of your ship. As a rule of thumb, add a cargo rack if you have another 4,000 lbs in resources to put in one, and make sure you fill existing cargo racks as much as possible before adding more.
-
What is the optimal way to haul resources long distances in as little time as possible?
- Once again, this depends largely on the factors in the previous answer. As a rule of thumb, load up your ship to around 50% weight when you are hauling resources.
Here are some related questions that I Won't be answering today, but I will include some links to people that have answered them in the past (to varying degrees of thoroughness and accuracy - be your own judge on the matter):
- How accurate is the in-game depiction of knots (speed)?
- Do higher-quality (fine/journeyman/etc.) sails actually give any benefit?
For a more in-depth discussion on each of these questions, keep reading! I will lead you through the testing I have done in singleplayer mode, and we will discuss factors that I had to ignore while testing, etc. Onward to information!
IMPORTANT NOTE BEFORE WE BEGIN: I am going to use the terms "maximum speed" and "speed" throughout this guide, and these each refer to a different concept. The maximum speed of a ship is the theoretical maximum speed it could go if it weighed 0 lbs. The speed of a ship is the actual speed of the ship, with whatever weight it currently has on it. Most of the math is done with the maximum speed, not the current speed. I will start by talking about how to use the speed and weight of a ship to compute the maximum speed.
How do speed, sails, and weight calculations work behind-the-scenes?
Ship speed depends on the type of ship you are sailing, the number and type of sails your ship is equipped with, the number of cargo racks on board, and the weight percentage. We will discuss all of these things here. I will lead you through the testing I did and try to explain some of the nuances that I had to think about
First - The effect of weight on ships:
My results: Ship speed is related to the weight of the ship according to the following equation:
speed = speed_max * sqrt(1-weight/max_weight)
NOTE: This does not take into account cargo racks - see the equation below for a more complete equation.
This results in a graph like the following:
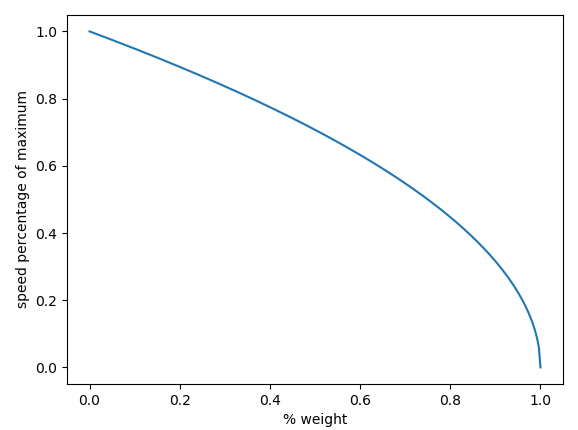
The maximum speed depends on the ship you are in and the sails you use - we will discuss this more in a bit. Since the speed changes as the square root of the remaining weight, you can see that the weight drops off really quickly as you get closer to 100% full. Thus, any weight above around 80% starts to really slow the ship down, and for that reason, I suggest never sailing above 85% capacity, since you just travel too slow.
My testing method: I spawned each ship in using ssf <sloop, schooner, brigantine, galleon> (pick one of the arguments in the <>). I set up the wind using the commands setwind 100 and setignorewind true (both are necessary for consistency). Then I opened the sails to full and marked down the current weight of the ship and the speed, once it stabilized. Using this method, the ship speed is very stable, unlike in the actual servers, where the speed bounces all over the place. Now, I used the admin command gfi gem_base 500 0 0 to get 500 gems, and I recorded the weight and speed - rinse and repeat until the ship stops moving. We now have a data for ship speed versus weight. Plotting the speed of the ship versus the square root part of the equation above, I got a straight line with the slope equal to the maximum velocity for that sail arrangement:
NOTE: Keep in mind that this method will spawn a schooner with 2 medium speed sails and a galleon with 5 large speeds sails, both of which are not the optimal sail arrangement. The max speed I got from these tests just correspond to a sub-optimal layout of sails. The important part here is how straight these lines are, which proves that this equation is correct.
This is a great fit, so I am pretty confident about the equation and the max speeds we get from this method. From now on, we can just manipulate the speed equation to solve for speed_max if we know the weight and speed of the ship. This will be useful in the next section.
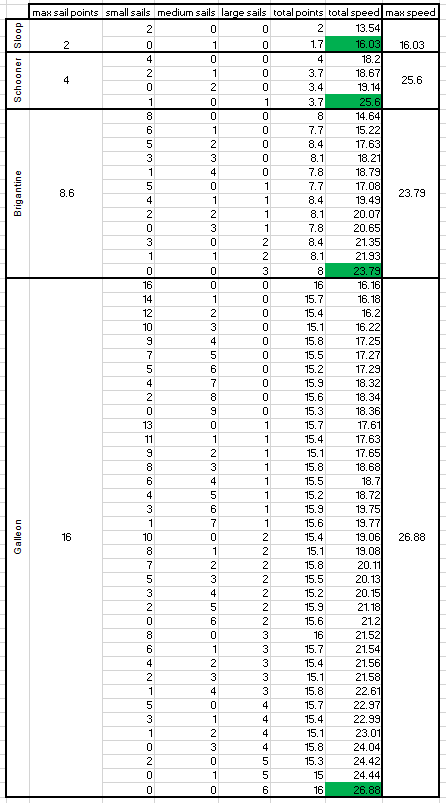
Second - The effect of sails on the speed of a ship:My results: Sails add linearly to the max speed of a ship. That means that half as many sails will push the ship half as fast. However, I found it surprising that each type of sail increases the max speed differently for each ship. The following table summarizes my results.

If you can find any patterns in that data, please let me know - I couldn't find anything. The main thing to note with this table is the speed per sail point. Remember that small sails cost 1 sail point, mediums cost 1.7, and larges cost 2.66 (ATLAS rounds this to 2.7, but it actually is 2.66 when you add multiple). The sails get more speed per point the larger you get (looking at a single ship). This means that it is always beneficial to use as large of sails as possible, and fill in any remaining points with smaller sails. This leads to the following optimal configurations:
- Sloop: 1 medium speed sail (max speed is 16.03 knots)
- Schooner: 1 large and 1 small speed sail (max speed is 21.05 + 4.55 = 25.6 knots)
- Brigantine: 3 large speed sails (max speed is 23.79)
- Galleon: 6 large speed sails (max speed is 26.88)
NOTE: I discuss the optimal sail configuration more in the next section.
This means that galleons are the fastest ship, followed closely by schooners, and then by brigs and sloops are the slowest. This is important, since many people tend to believe that schooners are the fastest ship, but this data shows that they are actually over a full knot slower on average.
My testing method: I spawned the ships as I did above. This time, I removed all sails and set up the configuration I wanted to look at (for example, 16 small speed sails on a galleon). I marked the weight and speed while slowly removing sails. Plotting the maximum speed (calculated as mentioned above) versus number of sails gave a line, and fitting a linear trendline in excel gave a slope that you see in the table above. If you want to compute the max speed of a ship, just add together the values for each sail from the table above.
Third - How do cargo racks affect speed?
My results: A full set of cargo racks (2 for a schooner, 4 for a brig, and 6 for a galleon) will reduce your maximum speed by 40%. This means that each cargo rack reduces your speed by the following amounts:
- Schooner: 20% per cargo rack
- Brigantine: 10% per cargo rack
- Galleon: 6.67% per cargo rack
If you only have some of the cargo racks, it affects your speed linearly (for example, 2 racks on a galleon reduces your speed by 40% * 2/6 = 13.3%). However, the racks also reduce the weight of anything inside of them by 80%, up to 8,000 lbs pre-reduction. This means that a full cargo rack reduces your ship weight by a total of 6400 lbs (80% of 8,000). The weight reduction will make your ship go faster, but it must counteract the speed reduction just for having the rack on the ship to be beneficial. This is complicated enough that I gave it its own section toward the end of this post. In general, always drop empty racks, and fill up your existing racks before you add another.
My testing method: In singleplayer, spawn in ships as mentioned above. Get the ship up to speed and start adding empty cargo racks. Make sure to take note of the weight each time you add a cargo rack (they weigh 50 lbs each). You can then compute the maximum speed as mentioned above, and the plot of maximum speed versus number of cargo racks gives a straight line. The slope of this line is the maximum speed decrease per cargo rack. This will vary based on your sail configuration, but the percentage speed decrease (speed decrease / maximum speed) will be the same for every ship. Assuming you read the section above about maximum speed, we can update our equation to include the number of cargo racks:
speed = speed_max * (1 - 0.40 * num_racks/max_racks) * sqrt(1-weight/max_weight)
In addition, I added weight to the cargo racks to verify that the rest of the equation still holds with cargo racks. Indeed, you see the same square root behavior. This means that the cargo rack has only the two effects listed above: max speed decrease, and weight decrease.
What speed sail configuration makes the fastest ship/ what type of ship is the fastest?
 My results: The table in the previous section summarizes my results about the how each sail type affects the maximum speed of a ship. Using this data, you can see that larger sails are generally more efficient than smaller sails. For example, look at a brigantine: Large speed sail adds 7.93 knots to your max speed, whereas the medium sails add 4.24 to the max speed. This means that the large speed sails add 2.94 knots per sail point, and mediums speed sails only add 2.49 knots per sail point. This is the reason that you should always use larger sails first, then fill in any remaining points with smaller sails.
Using the table on the left, you can see that galleons are the fastest ship in the game, when used with 6 large speed sails. This is followed by a schooner with 1 large and 1 small speed sail, and then by a brig with 3 large speed sails, and finally the sloop with 1 medium speed sail.
My testing method: I mentioned it above, but once again, briefly - spawn in each type of ship and mark down the weight of the ship, the speed you travel, and the number of sails as you vary the number and type of sails on the ship. The plot of maximum speed versus number of sails is a line, and the slope is equal to the max speed increase per sail. As for the optimal sail configuration, I did not test every combination of sails possible for each ship. Although we previously discussed why larger sails are more efficient, this does not automatically mean that using only the largest sails is always going to be the most efficient, since there are some leftover points that could, in theory, be used more effectively. I set up an excel spreadsheet (on the left) with all possible combinations of sails for which you cannot add another sail. Some of these use all of the sail points, and some do not. I then computed the maximum speed with each configuration and looked for the maximum speed out of all combinations. This just so happened to be the result where the largest sails are used first, as mentioned above (and everywhere else). This just proves definitively that there is no odd combination of sails that uses sail points more effectively that beats the tactic above.
How many cargo racks should I add to my ship to maximize speed?
Another way to phrase this question would be - how much cargo would I have to put into a new cargo rack to justify the additional speed decrease? This depends on the ship max carry weight, your ship's "empty" weight, and the number of cargo racks already on your ship. First, let's categorize the weight into "free" and "fixed" weight, by whether or not you can put it into a cargo rack. Fixed weight includes plank weight, repair materials, and crafting stations, to name a few examples. Free weight can include whatever cargo you have on board, armor or tools, or even blueprints (although you shouldn't store blueprints in cargo racks - there are only 100 slots to fill up with 8,000 lbs to be the most efficient).
The reason we want to categorize the weight is because the fixed weight is just dead weight, there is nothing we can do to reduce it. However, it will affect when we should add racks, since the speed is not linear with respect to weight. This means that we should add a rack when the amount of free weight we can store increases the speed of the ship (by reducing the weight) more than the extra cargo rack would decrease the speed. Mathematically, this gives us the equation (where x is the free weight and n is the number of cargo racks currently on the ship)

Obviously, this gets complicated fast, since we want to solve for x... Well, I did that for you, and here is the equation for the amount of free weight you need to store when adding a cargo rack:

where the empty weight is your fixed weight, and f(n) is listed below:
ok, this is still quite complex (we haven't even touched what to do when the free weight is outside of the range between 0 and 8,000, for example), let's unpack this a little.
Unpacking the results:
If the math makes you queasy, that's fine. I assume most people don't want the math, just the rule they should follow. Unfortunately, there is no simple rule, because the math is so complicated. But, we can get a few interesting tidbits from it:
- The heavier your ship is without any cargo (the fixed weight), the earlier you should be adding cargo racks
- If your galleon is very light (no fixed weight), the you should add a rack if you have 15.6% of your weight capacity in free weight. For a stock ship with 30k lbs capacity, this would be about 4,700 lbs of cargo. Of course, this assumes you have all your other racks filled already.
Here is a graph comparing the speed of a ship with optimal use of cargo racks versus no use of cargo racks. The flatter sections show where racks are added (for a default galleon with no fixed weight):
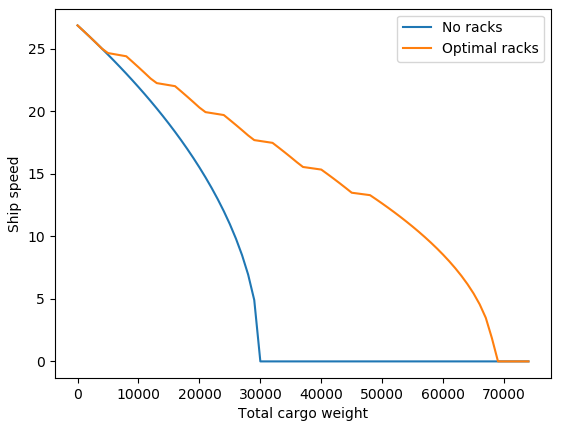
This may feel a little underwhelming, but you can get much more accurate numbers if you actually compute the free weight from the equation above. As a note, the amount of free weight needed changes with the number of racks on your ship, so it will change as you add more and more cargo. I suggest you add a sign on your ship, noting the ship capacity and fixed weight right after you make it, and then keep track of when you should add each of the 6 boxes on another sign.
What is the optimal way to haul resources long distances in as little time as possible?
This is another very complicated question. In addition to the problem of the cargo racks (addressed thoroughly above), you now have the added complexity of changing your goal. There are (as far as I can see) 2 main goals when it comes to hauling resources:
- Haul as many resources as possible in a given amount of time. This usually occurs when you have a supply route and you will keep making return trips indefinitely.
- Haul a given number of resources in the shortest time possible. This usually happens when you are trading or want to go on a relatively small-scale resource expedition.
For the first goal, you want to minimize the time spent on each pound of resource, so you can move as much as possible with the time you have. For the second goal, you are trying to minimize the total time spent, which is not always accomplished by moving the fastest at any given time. This is more complex. Let's look at each one individually:
Hauling indefinite resources in a given amount of time:
If you haul more at once, you move slower but get more across in one trip. If you haul less, you move faster but get fewer resources in one trip. We also have to consider that half of the time you are sailing, you are just bringing the empty ship back to the resource location. This means that the fixed weight of your ship makes a big difference in the optimal strategy. If your fixed weight is high, you should haul more cargo to avoid making many trips. If your fixed weight is low, you should haul less and move faster, since the wasted time on the return trip is quite small.
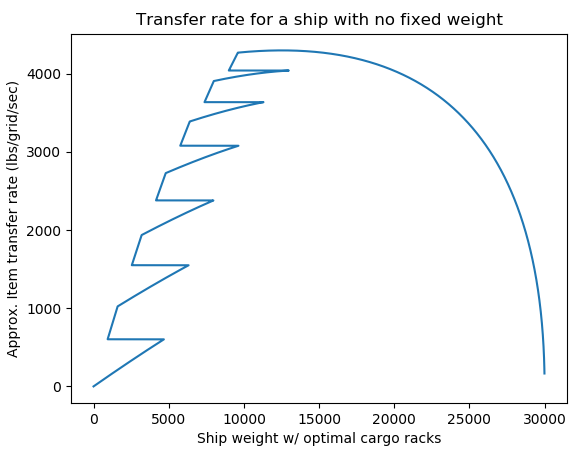
Working through some of the math, I made some plots for the item transfer rate versus the loaded ship weight (with optimal cargo racks). Here they are, and we will discuss them after:
It turns out that for 0 fixed weight, you should carry 12,530 lbs to be most efficient, and for 10,000 fixed weight, you should load up to 19,600 lbs. However, you can see from the 10k fixed weight graph that it may be possible to improve the efficiency further, since the cargo racks are optimized for speed, not item transfer rate. Specifically, adding the last cargo rack earlier would translate into extending the rightmost section of the graph further to the left, where it looks like it may reach a higher rate than this optimization allows. This is an area that can certainly be improved in the future.
More unpacking:
In general, you should load your ship up to about 50% of the way between the empty weight and the full weight to get the most efficient run. It can get better than that, but this will get you a majority of the way there, if you use your cargo racks optimally. Not much else to say here, that is the main rule-of-thumb of this section.
Hauling a fixed amount of resources as quickly as possible:
The goal here is just to minimize the time taken to get the resources back. Since speed drops off quickly as your ship fills up, the strategy will be to split the load up into equal-sized portions and take the same amount of weight each trip, so you avoid a few heavy/slow loads. Then, since every trip takes the same amount of time, we can just optimize each trip. However, the optimal weight HEAVILY depends on the amount of cargo you want to haul back. Look at the next graph (of optimal haul weights versus the target weight you wish to carry back), and let me know if you can make any sense of the chaos:
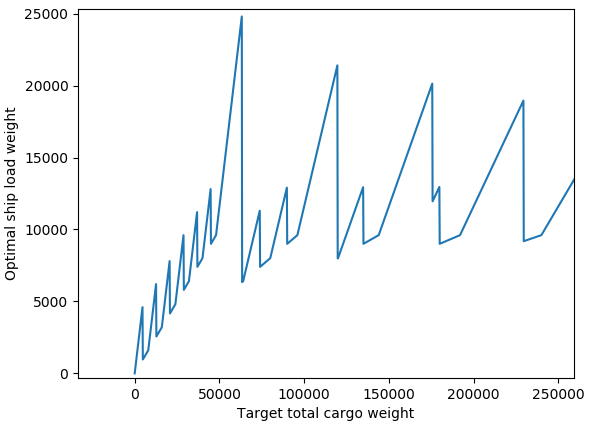
One bit of information to be gleaned from this mess is what happens when you need to haul a LOT of cargo. The chaotic mess converges to the same number that we got for the case where we wanted to haul an indefinite amount of cargo at as fast a rate as possible. Here is a zoomed-out image of the same graph I just showed.
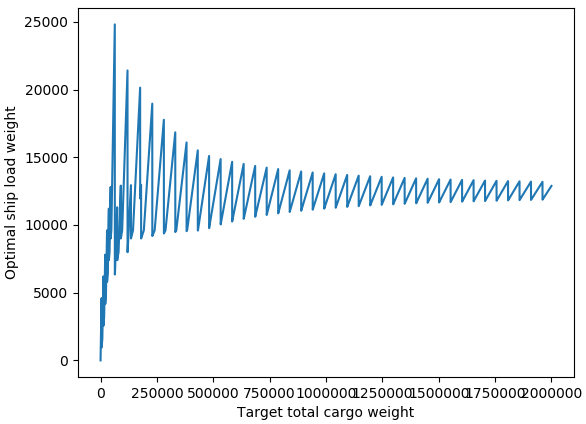
Obviously this behavior is much more complex than the behavior when you just want to maximize the rate. Therefore, I suggest that you just follow the advice there and let this section be more of a curiosity than actual advice. I mean, if you want to calculate the optimal carry weight every time you want to haul cargo, be my guest
Summary
Here, I will just list a bunch of bullet points that summarize the findings throughout the rest of the guide:
- As weight increases, your ship speed will fall faster and faster. Therefore, you should aim to keep your ship at around 50% capacity as a rule of thumb. This balances the amount of cargo you are hauling with the speed decrease from the additional weight.
- Galleons are the fastest ship in the game, followed by schooners, and then brigantines, and sloops are the slowest. When you are putting sails on these ships, start with the largest possible sail and fill in smaller sails afterward, to get the fastest sail configuration.
- As a rule of thumb, add a cargo rack when you have 4,000 pounds of resources available to store in it, and always fill up any existing cargo racks as much as possible.
- The heavier your ship is without any cargo on board, the earlier you want to add cargo racks when filling up your ship.
- The perfectly optimal weight arrangement is very complicated, and depends on many factors. You can look through the rest of this post for more info, but just know that these rules-of-thumb may not always be suitable for your exact scenario, and you'll need to use a bit of common sense.
Thank you for reading through this quite long guide. If you didn't understand a part of it (or any of it), I will be keeping up-to-date with the comments, so feel free to ask any questions there. If you have any ideas you want me to look into further, I am open to suggestions for another guide. If you liked this extremely thorough type of guide, please let me know, so I can be motivated to make more in the future.
-
 1
1
-
11
Painting animals/objects/tattoos: A comprehensive guide
in Guides
Posted · Edited by Simonsays095
Quote Din directly
First up, this is not a new idea to have a tutorial for:
However, I think each guide on this topic is missing some crucial step, so some newer players are confused by the actual process of painting in-game, from start to finish. In this post, I'm going to attempt to give a complete tutorial on how to paint in-game. This covers the following topics:
Required software:
File formats/graphics intro
Creating graphics to use in-game requires a little bit of file manipulation: the game uses .pnt files to store the graphics, which are unreadable by typical image editing software. You have to use the .pnt converter above (we'll explain thoroughly later) to convert the images to a .png format, which is readable and editable.
The only other tricky part is knowing which pixels in the image go to which parts of the in-game item (for those that are interested, this is known as UV mapping). We'll need to make templates for each and every item you want to make a graphic for - that includes player tattoos, each animal you may want to paint, each size and type of sail (including cosmetic designs), signs, billboards, and canvases. Each will need their own template! After that, the only limit is your own creativity.
Creating Templates
Creating a rough outline
Finding the file and converting to a .png
Find this folder, and in it you should see a file with a name that resembles what you named your painting in-game but it will not match exactly.
Cleaning up the template
Creating a graphic
Using a template to create graphics (using layers)
Converting back to .pnt and loading into the game
If you found any part of this tutorial confusing, please let me know in the comments, and I'll clarify any of the steps Also, please share your templates in the comments - that's the most tedious part of painting, and I know people have some templates for others to use out there - if you have a good stash of templates in one place, let me know and I'll add a link to the top of the post!